![]() #L4
#L4
Q:
How can I test memories with ETSNT?
Testing a 256K x 4 DRAM Under ETSNT
| The Memory Test feature of the ETS is possible because
of the tremendous versatility of the HILEVEL proprietarty gate arrays that
control the ETS pin electronics. The powerful ETSNT software redefines
the functions of these chips so that very deep memory devices can be tested
using very few vectors. When using the ETS for Memory Test the software
takes control of the vectors and the pattern generator program, so it is
important that you not modify these resources manually.
It is very important to plan ahead for Memory Test, particularly when building up your DUT board. This is due to the way in which the pin electronics boards are assigned for specific purposes. PE board #1 (pins 1-32) is used for the memory address pins of your device. ETSNT will control these pins like a counter, sequencing through memory addresses as part of a pattern generator loop. PE board #2 (pins 33-64) will function as the data I/O pins to the memory device under test. PE board #3 (pins 65-96) provide control pin functions for your memory device, such as output enables, chip enables and read/write pins. If you need more than 32 data I/O pins, PE boards 4 and up can be used for that purpose. You can use the PinList import feature in the Translators window to assign your pins and names, or do it manually from the F2 window. Just be sure to assign pins according to their types as illustrated in the above paragraph, and in accordance with your DUT board wiring. Here are the main steps in preparation. You can also use the ETSNT help for more assistance; just key F1 from the Memory Test window. |
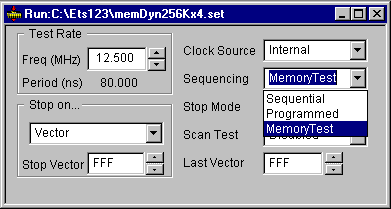
After preparing your test in the Memory Test window, the Run Setup window will have automatically selected "MemoryTest" as the sequencing mode. This is set after performing the "Generate" step in Memory Test setup.
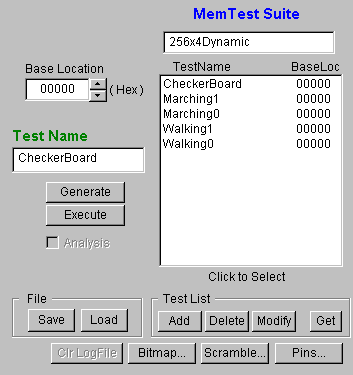
From the memory test dialog box define the tests to be performed and the
specific parameters of the device. Select the memory type...
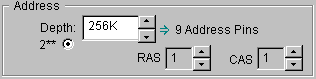
Then select the memory depth...
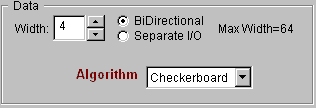
Select the memory width and the test algorithms to be Added
to the TestSuite...
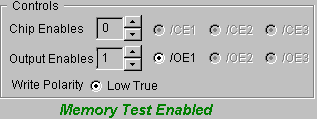
Select the memory controls...
Select Pins... to generate a list showing Pin Setup
information. The file "mempins.txt" (partial example shown to
the right with Pin numbers added) is created and opened in NotePad for
you. Pin Names and Groups in this list are suggestions only. System Channels,
however, are fixed in order to provide automatic algorithmic data generation.
The pin numbers (under Pin#) for the device can be entered directly into
this list which may then be imported to the Pin Setup dialog box.
You can use the "Input PinList" function under Translators to
import your own pin list.
Next, "Generate" the tests to be performed...
and RUN Memory Test by clicking the RUN button on your toolbar.
Memory cycle time can be adjusted by changing the Test
Rate in Run Setup. Note, however, that for dynamic ram two test
cycles are required per memory cycle.
QL4.zip is a zipped Word file of this Q'nApp.
Click your browser's Back button to return to the
Q'nApps
index.
![]()
PinList Generated for Memory Test
;SysCh Pin# Name Grp Type(IOBS)
1 14 ADR0 1 I
2 21 ADR1 1
I
3 20 ADR2 1
I
4 19 ADR3 1
I
5 18 ADR4 1
I
6 15 ADR5 1
I
7 13 ADR6 1
I
33 1 DATA0 2 B
34 2 DATA1 2 B
35 3 DATA2 2 B
36 4 DATA3 2 B
; make the pin below into R1 signal
65 52 /WRITE 3 I
66 25 /OE1 4 I
69 9 /CE1 5 I
$END